StormAudio ISP Evo immersive sound preamp/processor

One thing that interested me about the StormAudio ISP Evo is that, despite its obvious hi-fi function, it's more like a computer than a typical "prepro." While it does offer a few "legacy" analog inputs, it is for the most part all-digital, input to output, including network connections on both ends. Consequently, it is less likely to leave sonic fingerprints on the music than devices that convert digital to/from analog or modulate their signals with active amplification or attenuation. It is notable that, despite its audio function, the Storm completely lacks traditional audio specifications—distortion, dynamic range, and so on.

Yes, that aspect of the product was appealing, but the real trigger for me was that when I began this review, the StormAudio ISP Evo was the only consumer device to fully incorporate the latest version of Dirac Live Active Room Treatment (ART; footnote 1). An earlier, more primitive version of ART, called DLBC Full Bass Optimisation, was tantalizing but ran only on Windows or Mac computers and seemed never to get out of beta status. My expectation for the ISP Evo is that the installation and calibration procedures of this integrated version, which is now fully commercial and public, will be more coherent and smoother and that the results will be even better than before.

That's quite an attractive package, but it comes at the cost of easy integration. The ISP Evo cannot just be plunked down into any audio or home-theater system because its primary output is via network. Since it is "AoIP (AES67/Ravenna) Dante Compatible," it can communicate directly to network-enabled loudspeakers, DACs, amplifiers, and other devices—but not to those that don't speak one of those network dialects. In my setup, I needed to connect it to my PC Server by running the appropriate drivers in order to play files from my library or to stream music from the internet; Merging's MAD ASIO driver package installed on my PC server enabled bi-directional flow of multichannel audio between it and the ISP Evo. I was then able to send the Evo's output on to the network input of my Hapi II multichannel DAC, which is also Ravenna compliant.

Unpacking and installing the ISP Evo
The review sample of the ISP Evo arrived in a large shipping carton accompanied by an even larger flight case that included all the tools needed for calibration/room correction. Purchasers can have the calibration done by their dealer, although I always urge users to do it for themselves. There are advantages to DIY, even for newbies, as they will gain insight into how their audio system integrates with their room, and they'll know how to recalibrate it in the future when components or room conditions change. This StormAudio calibration kit—the stuff in the flight case—can be purchased for this purpose, but all you really need is a calibrated microphone (such as a UMIK-1), a long-enough USB cable, and a microphone stand with a boom. If you have been in this game for a bit, you likely have these things already. I do, and I used them. After looking at what was inside the kit StormAudio provided—nice stuff!—I returned the kit unused.

The ISP Evo itself is surprisingly hefty considering that it contains no big transformers, heatsinks, and so on, and considering the amount of empty space on the front and rear panels. On the left side of the rear panel is an IEC AC receptacle and a power switch. Adjacent to this are vents for a small ventilation fan, which during my audition was audible only briefly on power-up; if it operated at any other time, I was not aware of it. Below the vents is a stack of a single RJ45 connector (for general LAN access) and two USB-A jacks. Across the top are nine HDMI jacks, seven for input and two for output. Below these and to the right of the vents are two more RJ45 jacks and a large blank area (footnote 2). These two RJ45 jacks—a primary and a secondary—are where the audio-over-IP action takes place, dedicated to Ravenna/AES67, capable of managing audio input and output for up to 32 channels.

Running Ravenna communications can stress, and be stressed by, other functions running on a home network. I had been avoiding that by making a direct physical CAT6 link between my PC server and the Merging Hapi II. However, such a link is no longer physically possible when "baby makes three" and the ISP Evo is added to the system. Running all three devices on my regular LAN was, as expected, suboptimal, with occasional dropouts, so I added a Cisco CBS350-8 managed switch in accordance with Merging's recommendations and procedures (footnote 3).

The ISP Evo was connected to my regular home network from its single LAN jack—the RJ45 in the stack with the two USB-A connectors—so that I could access/control the unit via its web user interface. The Evo was connected to the separate Ravenna/AES67 subnet from one of its AoIP jacks.

Below these elements are a series of connectors that I spent little time with. From left to right, in/out jacks for IR control; four 12V trigger out jacks; six S/PDIF inputs, three RCA and three TosLink; a stereo pair of balanced XLR analog inputs; four stereo pairs of unbalanced RCA inputs (footnote 4); and finally, a single TosLink output for main zone down-mix for a local or remote audio monitor.

The central graphical display on the front is well-conceived; it clearly indicates what is going on in terms of input choice, source format, overall volume (via a large numeric display), and an active level display of the individual channels. Menu access via the display is accomplished with the Up, Down, and Home buttons to the left of the display and the large multifunction knob to the right. This works, but I found it easier to use the lightweight remote control for playback-related operation rather than to engage in the repetitive push/rotate/push routine to step through the hierarchy. And I much preferred to use the excellent web user interface, which I operated with my iPad, rather than get up from my seat.

Setup
With most traditional audio components, once you've made all the physical connections, you're ready to listen to music. Sure, there may be some settings to optimize, but the system is already functional. But when there are many channels and codecs to choose from and DSP choices to make, it doesn't work that way. The ISP Evo's logical design made the setup procedure quite painless, and I managed to accomplish it without factory assistance (although it was offered).

The task had three parts. First, get the three active components (PC Server, ISP Evo, Hapi II) to work together via Ravenna. Second, configure the ISP Evo to process the multichannel input signals to suit my output (loudspeaker) configuration. Third, run Dirac Live–ART, which was the original object of this undertaking.

PART 1. Adding the ISP Evo to the Ravenna network was easy. I made the physical connection to the network switch that the Hapi and PC Server were attached to. Within a minute of power-up, the Evo appeared as an available device in Ravenna's Aneman matrix display. I simply clicked on the appropriate intersections to connect 12 channels of audio output from the PC Server to the Evo's inputs and the same 12 channels from the Evo's outputs to the inputs of the Hapi DAC (footnote 5).

Fastidious readers may note that the PC Server now has two possible connections to the Evo: A direct one connecting the server output to the Evo via HDMI, and a bidirectional one via Ravenna and the Cisco switch. I used both at different times, and I preferred HDMI because it allowed me to see the JRiver/Roon user interfaces on the display monitor connected to the ISP Evo.

PART 2. I connected my Apple TV+ 4K, Oppo UDP-103, and PC Server to HDMI inputs of the Evo and its HDMI output to my display monitor. The ISP Evo's web user interface, accessible via computer or tablet, presents three options to the user: Remote Control, StormEasy, and Expert. Just like the physical RC, Remote Control duplicates what can be done from the front-panel controls. StormEasy is described as a "From Scratch" tool capable of creating a full new configuration. However, after I attempted to edit an early, hesitant attempt, I discovered that each new attempt is assumed to be "From Scratch" and some previous settings are deactivated or cleared—often not the ones I intended to correct. So, I presumed myself an Expert and found that procedure to be clear, logical, and—most of all—amenable to editing for my modest system, which has only one zone.

Because every setup will be different, I will not plaster these pages with extended descriptions of the procedures. Instead, I will list the major elements I needed to complete:

• Define and name the three HDMI inputs and PC input via Ravenna and assign them to buttons on the remote control.

• Identify, define, and map my 12 speakers.

• Set channel levels and delays with the aid of the Spatial Audio Calibration Toolkit (footnote 6), which provide useful test signals for all the channels in all channel configurations.

PART 3. Finally, I plugged my UMIK-1 microphone into my PC and navigated the Expert setup to initiate Dirac Live. I have been using Dirac Live for more than a decade, on all my PC servers and a series of prepros. Its integration in the ISP Evo is the most seamless I've experienced and, consequently, the easiest to calibrate. In the past, Dirac Live often didn't "see" all the speakers, and sometimes it thought a full-range speaker was a subwoofer or vice versa. The Evo never had an issue, despite my nonstandard channel order.

I was able to speed smoothly through the Volume Calibration and Measurement stages more than once, choosing the Focused Imaging option, which integrates 13 microphone measuring positions.


Footnote 1: See dirac.com/introducing-dirac-live-active-room-treatment.

Footnote 2: If you order the AES3 version of the Evo, the 16 channels of AES3 connectors would be installed here.

Footnote 3: Merging recommends a wide range of specific brands and models and, for many of those brands, offers automated configuration procedures. For example, the automated configuration procedure for the Cisco CBS350-8 is at merging.atlassian.net/wiki/spaces/PUBLIC-DOC/pages/4819248/Cisco+CBS350-8+Auto-configuration.

Footnote 4: Storm offers users the option of combining these 8 jacks for use as a 7.1 channel audio input.

Footnote 5: More details with illustrations of Aneman can be found in my review of the Hapi II in the January 2024 Stereophile.

Footnote 6: See spatialcd.com.

COMPANY INFO
StormAudio
8 Rue del la Rabotiere
44800 Saint-Herblain
France
info@stormaudio.com
+33 2 49 62 30 49
ARTICLE CONTENTS

COMMENTS
Glotz's picture

I want this Storm and a full array of Genelec powered speakers. I hope the Storm will be at a show this year.

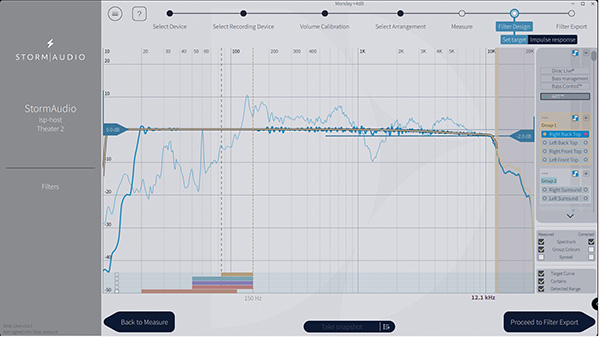
The DL-Art circuit alone reads like restoration technology from a nearby galaxy. I also like the statement about envelopment vs. immersion. Visual.

His insights into Dolby Atmos' various configurations lend a needed perspective to the discussion from a few months ago. Another killer review and I always feel Kal is always one step ahead of the rest of us luddites.

thethanimal's picture

Kal, can you clarify what benefit the ISP Evo brings over the ISP Core 16, beyond the ability to choose your own DAC? As I type, I realize now the Evo has 32 channels of processing, but of course that's far beyond what even most "power users" would utilize. The Core 16 looks like it could do all your Arvus/Evo/Hapi chain can do, with what I imagine is only a small delta of the built-in DACs vs. the Hapi.

To Glotz's point above, all you'd need is some XLR cables to some Genelec 8040s, and you're in the high-end Atmos game for the same price as just the ISP Evo. Or is there another key differentiator I'm missing?

Kal Rubinson's picture

Sure, the Core 16 would probably have worked. The EVO was chosen for this review because I wanted to experience a full implementation of DIRAC-ART and Storm Audio suggested the EVO. That fit well with my system because it could easily connect with my HAPI via Ravenna.

I love the prospect of network-based connectivity and am working to implement it in my system now. Discrete wiring of multiple components becomes daunting as the channel count rises.

thethanimal's picture

This article has ignited my tech nerd side. Looks like with the PoE/AoIP options a full "rack" for streaming would consist of nothing more than an Apple TV, this ISP Evo, and a network switch -- then just Cat 6 cables to suitable powered speakers.

In your Ravenna system, it looks like the Trinnov Amplitude16 would be a good fit. ICEpower similar to your NAD C 298 for 16 channels with DB25 connectors or optional AoIP. Could one box replace your Benchmark/NAD stack? The Class AB vs Class D purists would say no...

All a mental exercise for me right now, as space and funds don't allow a multichannel set-up for now. My only experience with Atmos vs. stereo is on my in-laws' mid-fi Sony/Klipsch theater set-up, where the difference was marginal. I'd love to hear something like that Genelec demo.

Kal Rubinson's picture

I am thinking that way, too, and have distributed CAT6 to all my speaker locations. However, I have not yet found compatible speakers to my taste and a multichannel amp, like the Trinnov, is an inefficient way to distribute to widely distributed speakers.

Quote:

Could one box replace your Benchmark/NAD stack?

Possibly but why? Is there a comparable MCH amp that is smaller/lighter? Besides, I can run 4 channels of line output over a single CAT6. ;-)

X